【iOS備忘録】UITableView 表示から選択まで
最初にデリゲートなど設定
ストーリーボードでUITableViewを貼り付け、
@property (weak, nonatomic) IBOutlet UITableView *tableView;
UITableViewのプロトコルを実装し、
@interface ViewController ()<UITableViewDelegate, UITableViewDataSource>
...
viewDidLoadにデリゲートメソッドを実装する。
self.tableView.delegate = self;
self.tableView.dataSource = self;
結果、interface部とviewDidLoadは以下のようになります。
@interface ViewController ()<UITableViewDelegate, UITableViewDataSource>
@property (weak, nonatomic) IBOutlet UITableView *tableView;
@property (nonatomic, strong) NSArray *array1,*array2;
@end
@implementation ViewController
- (void)viewDidLoad {
[super viewDidLoad];
// デリゲートメソッド実装
self.tableView.delegate = self;
self.tableView.dataSource = self;
self.array1 = @[@"aaa",@"bbb",@"ccc"];
self.array2 = @[@"111",@"222",@"333"];
}
テーブルに関する設定
ここでは2つのセクションに、2つの配列array1,array2を表示させることにします。
//まず、セクション数を設定し、
- (NSInteger)numberOfSectionsInTableView:(UITableView *)tableView
{
return 2;
}
//セクションごとにデータが何件あるか設定し、
- (NSInteger)tableView:(UITableView *)tableView numberOfRowsInSection:(NSInteger)section{
NSInteger dataCount;
switch (section) {
case 0:
dataCount = self.array1.count;
break;
case 1:
dataCount = self.array2.count;
break;
default:
break;
}
return dataCount;
}
//セクションごとのテーブルセルにデータを設定します。
- (UITableViewCell *)tableView:(UITableView *)tableView cellForRowAtIndexPath:(NSIndexPath *)indexPath{
static NSString *CellIdentifier = @"Cell";
UITableViewCell *cell = [tableView dequeueReusableCellWithIdentifier:CellIdentifier];
if (!cell) {
cell = [[UITableViewCell alloc] initWithStyle:UITableViewCellStyleDefault
reuseIdentifier:CellIdentifier];
}
switch (indexPath.section) {
case 0:
cell.textLabel.text = self.array1[indexPath.row];
break;
case 1:
cell.textLabel.text = self.array2[indexPath.row];
break;
default:
break;
}
return cell;
}
選択したセルを取得する
//選択されたセルのセクションと列番号を取得します。
- (void)tableView:(UITableView *)tableView didSelectRowAtIndexPath:(NSIndexPath *)indexPath
{
NSLog(@"選択したセクションは%i,列番号は%i",(int)indexPath.section,(int)indexPath.row);
switch (indexPath.section) {
case 0:
NSLog(@"選択したTextは%@",self.array1[indexPath.row]);
break;
case 1:
NSLog(@"選択したTextは%@",self.array2[indexPath.row]);
break;
default:
break;
}
}
見出しもつけてみる
//セクションごとのタイトルを設定(任意)
- (NSString *)tableView:(UITableView *)tableView titleForHeaderInSection:(NSInteger)section {
switch(section) {
case 0:
return @"セクション英文字";
break;
case 1:
return @"セクション数字";
break;
}
return nil;
}
表示と結果
左が表示直後、右がセルを選択した状態です。


出力ログは以下のとおりです。
選択したセクションは1,列番号は0
選択したTextは111
【iOS備忘録】画面にある全てのUIViewを選ぶsubviews
画面上に配置したUIView(もしくはその派生クラス)をすべて一度に操作する方法
まず、画面に何かを配置しておきます。
[self.view addSubview:object];
それらobjectの一つ一つをすべて削除したり書き換えたり移動したりと、一連の動きを与えます。使うのはsubviewsです。
//画面上にあるUIViewやUILabelなどすべて消去
for (UIView *v in self.view.subviews) {
[v removeFromSuperview];
}
//(100,100)より右下にあるUIViewやUILabelなどすべて消去
for (UIView *v in self.view.subviews) {
if (v.center.x>100 && v.center.y>100) {
[v removeFromSuperview];
}
}
for (UIView *v in self.view.subviews) {
if ([v isMemberOfClass:[UILabel class]]) {
v.center = CGPointMake(v.center.x+100, v.center.y+100);
}
}
ちなみに、isMenberOfClassでインスタンスがどのクラスに属するかを特定できます。
が、インスタンス v がUILabelから派生するクラスに属するかどうかまではチェックしてくれません。これをするのはisKindOfClassです。
if ([v isKindOfClass:[UILabel class]]) {・・・
【iOS備忘録】複数のViewをドラッグで移動する
UIPanGestureRecognizer
まずは、いくつかのViewを配置します。
UILabel *label = [[UILabel alloc]init];
label.frame = CGRectMake(100, 100, 60, 20);
label.backgroundColor = [UIColor yellowColor];
label.textColor = [UIColor blueColor];
label.font = [UIFont fontWithName:@"AppleGothic" size:12];
label.text = @"hoge";
label.userInteractionEnabled = YES;
[self.view addSubview:label];
UIView *View1 = [[UIView alloc] initWithFrame:CGRectMake(0, 0, 100, 100)];
View1.center = CGPointMake(100, 200);
View1.backgroundColor = [UIColor blueColor];
[self.view addSubview:View1];
UIView *View2 = [[UIView alloc] initWithFrame:CGRectMake(0, 0, 100, 100)];
View2.center = CGPointMake(110, 210);
View2.backgroundColor = [UIColor greenColor];
[self.view addSubview:View2];
[self setPanGesture:label];
[self setPanGesture:View1];
[self setPanGesture:View2];
1つのUILabel、2つのUIViewを配置してみました。緑が上になっていますね。
こんな感じになります。
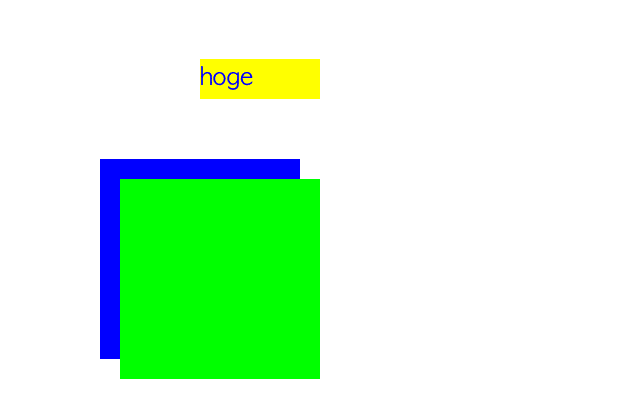
これをドラッグして移動してみましょう。
-(void)setPanGesture:(UIView*)view{
UIPanGestureRecognizer *panGesture = [[UIPanGestureRecognizer alloc] initWithTarget:self action:@selector(dragged:)];
[view addGestureRecognizer:panGesture];
}
-(void)dragged:(UIPanGestureRecognizer*) sender{
if(sender.state == UIGestureRecognizerStateEnded){
//ドラッグ終了時の処理
}else{
UIView *draggedView = sender.view;
//選択したViewを最前面に
[self.view bringSubviewToFront:draggedView];
//ドラッグ移動した分だけViewを移動
CGPoint delta = [sender translationInView:draggedView];
CGPoint movedPoint = CGPointMake(draggedView.center.x + delta.x, draggedView.center.y + delta.y);
draggedView.center = movedPoint;
//ドラッグの初期化
[sender setTranslation:CGPointZero inView:draggedView];
}
}
ドラッグしてみました。ドラッグしているものが最前面になっていますね。

【iOS備忘録】 UIAlertController で選択する
iOS8以降でアラートとアクションシートを表示する
iOS7までは UIAlertView や UIActionSheet を使っていましたが、これはiOS8からは非推奨になったようなので、推奨されている UIAlertController の使い方をメモ。
アラートでYes/Noを選択する
- (IBAction)alertBtnEnter:(id)sender {
//アラートコントローラーのインスタンスを生成
UIAlertController *alertController = [UIAlertController alertControllerWithTitle:@"確認" message:@"本当に終わりにしてもいいですか?" preferredStyle:UIAlertControllerStyleAlert];
// 左から順にボタンが配置
[alertController addAction:[UIAlertAction actionWithTitle:@"はい" style:UIAlertActionStyleDefault handler:^(UIAlertAction *action) {
[self otherButtonPushed];
}]];
[alertController addAction:[UIAlertAction actionWithTitle:@"いいえ" style:UIAlertActionStyleDefault handler:^(UIAlertAction *action) {
[self cancelButtonPushed];
}]];
[self presentViewController:alertController animated:YES completion:nil];
}
- (void)cancelButtonPushed {
// cancelボタンが押された時の処理
}
- (void)otherButtonPushed {
// otherボタンが押された時の処理
}
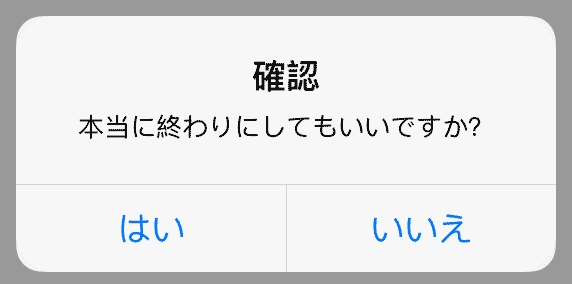
説明
まず、アラートコントローラーのインスタンス(alertController)を生成し、そこにボタンを配置していきます。
addAction で作りますが、左のボタンから順に配置されます。
最後にpresentViewControllerでインスタンス(alertController)を呼び出します。
アクションシートで複数の選択肢から選択する
- (IBAction)actionSheetBtnEnter:(id)sender {
UIAlertController *alertController = [UIAlertController alertControllerWithTitle:@"選択" message:@"どれにしますか?" preferredStyle:UIAlertControllerStyleActionSheet];
// 上から順にボタンが配置
[alertController addAction:[UIAlertAction actionWithTitle:@"選択1" style:UIAlertActionStyleDefault handler:^(UIAlertAction *action) {
[self selectedActionWith:1];
}]];
[alertController addAction:[UIAlertAction actionWithTitle:@"選択2" style:UIAlertActionStyleDefault handler:^(UIAlertAction *action) {
[self selectedActionWith:2];
}]];
[alertController addAction:[UIAlertAction actionWithTitle:@"選択3" style:UIAlertActionStyleDefault handler:^(UIAlertAction *action) {
[self selectedActionWith:3];
}]];
[alertController addAction:[UIAlertAction actionWithTitle:@"クリア" style:UIAlertActionStyleDefault handler:^(UIAlertAction *action) {
[self selectedActionWith:0];
}]];
// iPad用 (これが無いとエラー)
alertController.popoverPresentationController.sourceView = self.view;
alertController.popoverPresentationController.sourceRect = CGRectMake(_actionSheetBtn.frame.origin.x, _actionSheetBtn.frame.origin.y, 20.0, 20.0);
//alertController.popoverPresentationController.sourceView = _actionSheetBtn; //でも良い
[self presentViewController:alertController animated:YES completion:nil];
}
-(void)selectedActionWith:(int)index{
NSLog(@"選択: %d",index);
// 選択時の処理
}
iPhone画面
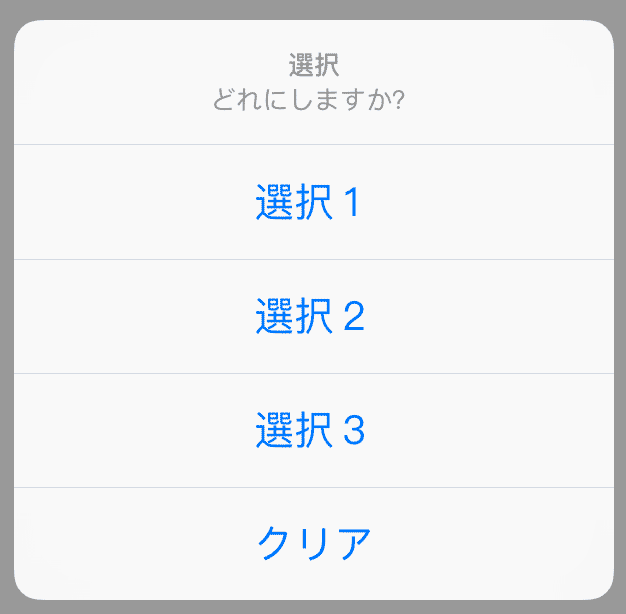
iPad画面(吹き出し風)

説明
基本的にアラートのときと同じで、アラートコントローラーのインスタンス(alertController)を生成し、そこにボタンを配置していきます。addAction で上のボタンから順に配置されます。
popoverPresentationController の設定をしないと、iPadでエラーが出てしまいますので、必ず入れましょう。その際、表示位置は sourceRect でも sourceView でも設定できますが、 sourceView では吹き出しの位置が微妙に思い通りの位置に出ないように思います。
無線プリンタが繋がらない謎解明
新しくCanonのプリンターを購入し、当然のごとく無線接続したのですが、5分の1くらい印刷すると「接続できません」といって印刷を諦めてしまいます。前のEpsonではちゃんと印刷できたのに・・・
1ヶ月ほど原因究明に明け暮れていたのですが、ようやく謎が解明したので報告。
ズバリ、無線の電波が弱かった!
以前使っていたEPSONのプリンタは問題なく使用できていたので、まさか電波が弱いとは疑っていなかったのです。でも、もしやと思いiPhoneのアプリで計測。
使ったのは Speedtest.net by Ookla - Mobile
まずは無線親機の近くで計測

続いてプリンタ近くで計測
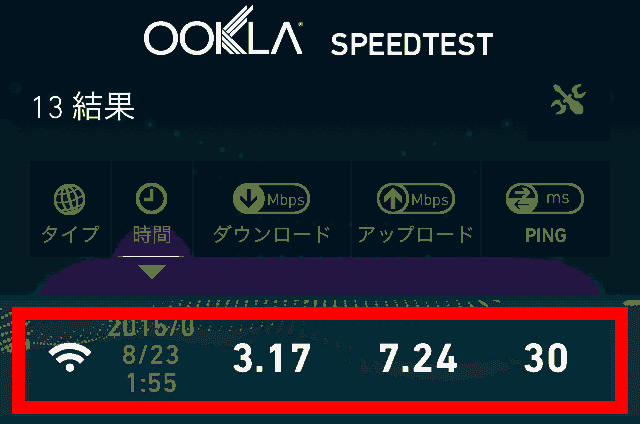
ずいぶん電波が減衰しているのが分かります。多分、EPSONの受信機の位置とCanonの
受信機位置が違っているのでしょう。10cm違うだけでも電波状況が変わるので。
で、原因はわかったので、対策です。
狭い我が家で、やっと捻出したプリンタ置き場なので、それを変えるわけにはいかない。無線親機の位置を変えるのも無理。となれば、中継器を買うしか無い。
目をつけたのが、なかなかかわいいこいつ。
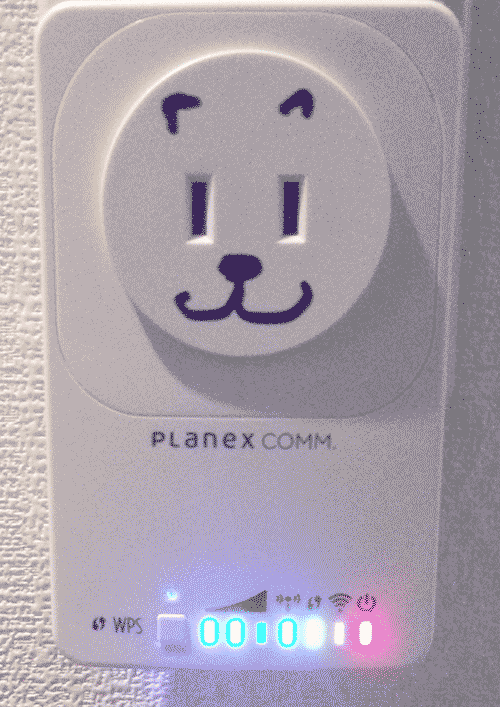
その名は、中継大王(笑)https://www.planex.co.jp/products/mzk-ex300np/
プリンタの近くで、まだ電波が減衰していない辺りにあるコンセントにさすことで、無線電波を中継してくれます。
中継大王の活躍で、プリント位置にまで電波は十分届くようになりました。

今まで印刷できたり出来なかったりの不安定な状態だったプリンタが、すっかり安定しましたよ。
※中継大王はWPSで簡単設定なのですが、我が家はWPS非対応のAirMac Time Cupsule で、手動で設定しなければ使えません。設定の仕方は以下ブログを参考にしました。
http://crunk.hateblo.jp/entry/2014/08/31/071410
とても丁寧な解説です。ありがとうございました。
【iOS備忘録】 いろいろな文字列を数値やブール値に変換してみる
文字列を数値に変換する方法
文字列変数をstr とします。これを数値に変換するメソッドには
intValue
doubleValue
floatValue
などがあります。つまり
[str intValue]
とすれば、文字列 str が数値に変換されます。Yes や No などのBool値に変換するには
boolValue
です。NSNumberに変換したい場合は
@(str intValue)
とすればいいわけですね。
例
NSString *str = @"123";
int a;
a=[str intValue];
これでaに123という数値が入ります。
実験1. 文字列に数字以外の情報が入っている場合
i ) 数字+文字 の場合
最初の数字がすべて数値になります。
NSString *str = @"123だよ";
int a;
a=[str intValue];
NSLog(@"a=%d",a);
出力結果
a=123
ii ) 文字+数字 の場合
0になります。
NSString *str = @"これは123";
int a;
a=[str intValue];
NSLog(@"a=%d",a);
出力結果
a=0
iii ) 数字+文字+数字 の場合
最初の数字のみ
NSString *str = @"123と456";
int a;
a=[str intValue];
NSLog(@"a=%d",a);
出力結果
a=123
iv) 数字+半角スペース+数字 の場合
最初の数字のみ
NSString *str = @"123 456";
NSInteger a;
a=[str integerValue];
出力結果
a=123
実験2. Bool値になる条件は?
i ) 最初の数字列に0以外の数字が含まれている場合
Yes(数値=1)に変換されます。
NSString *str = @"000123";
BOOL a;
a=[str boolValue];
NSLog(@"a=%d",a);
出力結果
a=1
ii ) 最初の数字列に0のみが含まれている場合
No(数値=0)に変換されます。
NSString *str = @"000と123";
BOOL a;
a=[str boolValue];
NSLog(@"a=%d",a);
出力結果
a=0
iii ) 文字列の最初がY, y, T, t で始まる場合
Yes(数値=1)に変換されます。
NSString *str = @"yellow";
BOOL a;
a=[str boolValue];
NSLog(@"a=%d",a);
出力結果
a=1
iv ) 文字列の最初がY, y, T, t で始まらない場合
No(数値=0)に変換されます。
NSString *str = @"ok123";
BOOL a;
a=[str boolValue];
NSLog(@"a=%d",a);
出力結果
a=0
【iOS備忘録】 今日の日付を取得し、文字列に変換する
簡単なことのようだけど、NSDateFormatterを使う辺りが、なかなか思いつかなかったりするのでメモ。
1.日付を文字列にする
現在日時から 2014.11.25 という日付の文字列を取得するには・・・
NSDate *nowdate = [NSDate date];
NSDateFormatter *formatter = [[NSDateFormatter alloc] init];
[formatter setDateFormat:@"yyyy.MM.dd"];
NSString *date2 = [formatter stringFromDate:nowdate];
時間も取得する場合は
[formatter setDateFormat:@"yyyy.MM.dd HH:mm:ss"];
2.文字列を日付(NSDate)のデータにする
文字列のままだと比較したり、差をとったり出来ないので、必要とあらばNSDateに変換しておきましょう。1.とほとんど一緒ですよ〜。
NSString *string = @"2014.11.25 20:05:14";
NSDateFormatter *formatter = [[NSDateFormatteralloc] init];
formatter.dateFormat = @"yyyy.MM.dd HH:mm:ss";
NSDate *date = [formatter dateFromString:string];
3.日時を比較する
NSDate *date1,*date2;
NSComparisonResult result = [date1 compare:date2];
if ( result == NSOrderedSame ) {
//date1==date2
}else if( result == NSOrderedAscending ){
//date1 < date2
}else if( result == NSOrderedDescending ){
//date1 > date2
}
4.日時の差を取る
差date2-date1をsecに代入する。
NSDate *date1,*date2;
NSTimeInterval sec = [date2 timeIntervalSinceDate:date1];